1. Why Simulate Before Printing: The Real Cost Equation
A conformal cooling insert is not a standard machined part you can tweak on a manual mill if it turns out wrong. The channel geometry is locked into the printed metal at build time. If the thermal design is wrong — if you have hot spots, insufficient flow, or poor temperature uniformity — the entire insert may need to be reprinted.
Here is what that costs in practice:
| Insert Size / Complexity | Print + Finish Cost | Redesign & Reprint if Wrong |
|---|---|---|
| Small insert (<150×150mm) | $800–2,500 | $800–2,500 wasted, plus 2–4 week delay |
| Medium insert (150–300mm) | $2,500–6,000 | $2,500–6,000 wasted, plus 3–5 week delay |
| Large or complex insert (>300mm) | $6,000–10,000+ | $6,000–10,000+ wasted, plus 4–6 week delay |
Now compare that against the cost of simulation:
- $0 — if you use MouldNova's free cooling analysis service (Moldflow report included with quote)
- $200–500 — if you run it yourself with an existing Moldflow/Moldex3D license (2–4 hours of engineer time)
- $500–800 — typical bureau simulation cost for a conformal cooling analysis with report
There is also a less obvious benefit: simulation forces you to define your process conditions precisely before manufacturing. Melt temperature, coolant inlet temperature, target flow rate — these need to be specified anyway. Simulation just makes you specify them before the insert is built, not after the first trial shot reveals a problem.
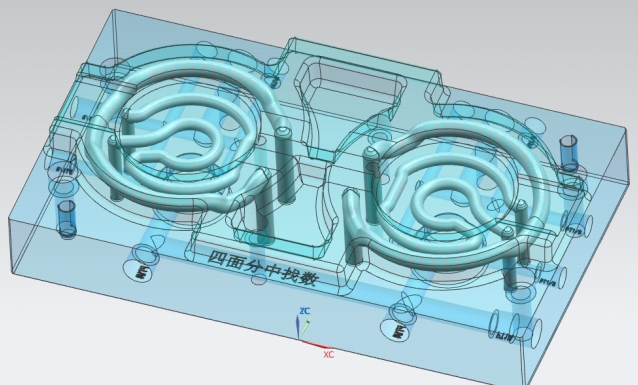
2. What Conformal Cooling Simulation Actually Calculates
Moldflow and Moldex3D run a coupled thermal analysis that models three simultaneous processes: heat transfer from the solidifying plastic into the mold steel, conduction through the mold body, and convective heat removal by the flowing coolant. The four outputs that matter for conformal cooling decisions are:
Cooling Time Map
A color contour plot showing the time required (in seconds) for each region of the cavity surface to reach the specified ejection temperature. Reveals hot spots — regions that limit the cycle because they cool slowest.
Temperature Distribution (ΔT)
The temperature across the cavity surface at the end of the cooling phase. The key metric is ΔT — the difference between the hottest and coolest point. High ΔT drives differential shrinkage and warpage.
Pressure Drop & Flow Rate
The hydraulic analysis of the cooling circuit: total pressure drop across the channel (bar), required volumetric flow rate (L/min), and Reynolds number at each channel segment. Drives pump and chiller sizing decisions.
Warpage Prediction
The predicted deflection of the ejected part — magnitude (mm) and direction vector — caused by differential shrinkage from non-uniform cooling. Compare conventional vs. conformal design side by side to quantify the improvement.
Understanding which output is most important for your decision depends on the part. For tight-tolerance parts, temperature distribution and warpage are the priority outputs. For high-volume parts where cycle time is the primary target, cooling time and pressure drop govern the design choices.
3. Setting Up the Simulation: Step by Step
The following workflow applies to both Moldflow Insight and Moldex3D R&D. The specific menu names differ, but the logical sequence is identical.
Step 1: Mold Geometry Import
Import your insert geometry as a STEP file. IGES is also accepted but STEP is preferred — it carries more solid geometry information and reduces healing work. Before importing, confirm that:
- The STEP file contains both the cavity/core insert body and the cooling channel solid geometry (as a separate body or as a subtracted void in the insert)
- Channel centerlines are available as sketch curves — these are needed for the 1D beam element meshing used in cooling circuit analysis
- The parent mold plate geometry is included if you want to model conduction losses through the surrounding steel (recommended for accuracy)
Step 2: Mesh Strategy
Two meshing approaches are used in conformal cooling simulation:
| Mesh Type | Best For | Typical Element Size | Run Time |
|---|---|---|---|
| Shell (midplane or dual-domain) | Initial screening, simple parts, fast iteration | 1.5–2.5mm | 15–45 min |
| Solid (3D tetrahedral) | Complex geometry, thick/variable walls, final validation | 1–2mm | 2–8 hours |
For conformal cooling work, always use solid (3D) mesh for the final simulation. Shell mesh is adequate for fill analysis but misses the through-thickness thermal gradients that conformal cooling is specifically designed to address. A 1–2mm element size is appropriate for most mold inserts; reduce to 0.5–1mm at channel walls and in thin-wall regions where the thermal gradient is steepest.
Step 3: Material Database — Resin Selection
Select the exact resin from the material library — not a generic family material. The thermal properties that drive cooling simulation accuracy are:
- Specific heat capacity (Cp) — affects the amount of heat that must be removed per unit mass
- Thermal conductivity (k) — governs how quickly heat moves through the solidified plastic toward the mold surface
- Viscosity curve (η vs. shear rate and temperature) — needed for fill/pack phases but less critical for cooling-only analysis
- Ejection temperature — defines when the cooling phase is complete; check the resin datasheet, not a default value
Step 4: Cooling Channel Geometry Definition
Define the conformal channel circuit within the simulation. In Moldflow, this is done via the Cooling Circuit Wizard. In Moldex3D, use the Cooling Channel definition tool. Specify:
- Channel centerline path (import from CAD sketch or define in simulation environment)
- Channel cross-section: diameter for circular channels (most common), or width/height for rectangular channels
- Circuit inlet and outlet locations
- Coolant flow direction (in series or parallel branches)
- Inlet coolant temperature (use your actual chiller setpoint — not ambient room temperature)
- Coolant type: water (most common), water-glycol mixture (for sub-zero chilling), or oil (for elevated-temperature molds)
Step 5: Process Conditions
Set the injection molding process conditions that boundary the thermal analysis:
| Parameter | Where to Find It | Typical Range (commodity resins) |
|---|---|---|
| Melt temperature | Resin datasheet (mold filling temp range) | 200–300°C |
| Mold temperature (cavity side) | Resin datasheet or process sheet | 20–80°C |
| Coolant inlet temperature | Chiller setpoint (measure, don't assume) | 8–25°C |
| Coolant flow rate (per circuit) | Initial estimate: target Re 5,000–8,000 | 3–12 L/min |
| Cooling time (initial estimate) | Rule of thumb: t ≈ (wall thickness)² × constant | 5–40 sec depending on wall and resin |
| Ejection temperature | Resin datasheet (HDT or Vicat softening point) | 60–140°C |
For the first simulation run, use a conservative (longer) initial cooling time estimate. The simulation will tell you the actual required cooling time in the results — you then iterate to find the minimum cooling time that satisfies your temperature uniformity and ejection temperature requirements.
4. Understanding Cooling Time Results
The cooling time map is a color contour displayed on the cavity surface. Each color represents the local time (in seconds) for that surface region to cool from melt temperature to the specified ejection temperature. The color scale typically runs from blue (fastest cooling) to red (slowest cooling).
What You Are Looking For
The governing cycle time is set by the slowest-cooling region — the red zone on the map. Your target is to make the entire map as uniform as possible, with the range between fastest and slowest cooling as small as the part geometry allows.
- Hot spots (red zones) are areas where the conformal channel is too far from the cavity surface, where flow is laminar (insufficient Re), or where the channel pitch is too large. These are the regions to target in redesign.
- Overcooled zones (deep blue) mean the channel is too close to the surface or flow rate is excessive in that branch. Overcooling wastes energy and can cause the cavity surface to drop below the optimal mold temperature, causing surface defects (cold flow lines, poor gloss).
- Uniform map (narrow color range) is the target. A good conformal cooling design will show a cooling time range of ±15–20% around the mean.
Cooling Time and Warpage Risk
There is a direct relationship between the spatial pattern of the cooling time map and the direction of part warpage after ejection. Regions that cool faster solidify first and reach a lower stress state. Adjacent regions still cooling undergo constrained shrinkage against the already-solidified material. The cooling time gradient predicts where differential shrinkage will occur — and the warpage output (Section 7) quantifies how much deflection that gradient produces.
5. Understanding Temperature Distribution Results
The temperature distribution output shows the mold cavity surface temperature at a specific moment in the cooling phase — usually at the end of cooling, just before ejection. The key metric is ΔT: the difference between the maximum and minimum surface temperature across the cavity.
ΔT Interpretation Table
| ΔT at End of Cooling Phase | Assessment | Action Required |
|---|---|---|
| < 5°C | Excellent — uniform cooling | Proceed to manufacture. Warpage risk is minimal. |
| 5–10°C | Acceptable for most commercial parts | Review hot spots. Acceptable unless tight tolerances are required. |
| 10–20°C | Warpage risk — design review needed | Identify hot spot location, adjust channel pitch or depth. Re-simulate. |
| 20–35°C | High warpage risk | Significant redesign required. Do not manufacture at this ΔT for precision parts. |
| > 35°C | Redesign required | Channel layout is fundamentally inadequate. Full redesign before proceeding. |
How Temperature Gradients Cause Differential Shrinkage
Plastic shrinks as it cools from melt to solid. The volumetric shrinkage for a typical semi-crystalline resin (PP, PA66) is 1.0–2.5%; for amorphous resins (ABS, PC) it is 0.4–0.8%. If different regions of the part cool at different rates, they pass through the solidification transition at different times and end up with different levels of frozen-in stress.
The mechanism is straightforward: a hot region shrinks later than its already-solidified neighbor. That late shrinkage is constrained by the rigid neighbor, so the hot region ends up with tensile residual stress. After ejection, this stress relaxes and the part warps — bending away from the hot side. The warpage direction directly follows the temperature gradient: the part curves toward the side that cooled fastest (the colder side).
This is why temperature distribution uniformity is the primary thermal design target in conformal cooling — not just achieving a fast absolute cooling time, but achieving uniform cooling across the entire cavity surface simultaneously.
6. Pressure Drop and Flow Rate: The Hydraulics Check
Heat transfer efficiency in a cooling channel depends entirely on whether the flow is turbulent or laminar. This is not a minor detail — it is the most critical hydraulic design criterion.
Reynolds Number: The Governing Parameter
The Reynolds number for pipe flow is:
Re = (ρ × v × D) / μ
where ρ = coolant density (kg/m³), v = flow velocity (m/s), D = channel diameter (m), μ = dynamic viscosity (Pa·s)
For water at 15°C: ρ ≈ 999 kg/m³, μ ≈ 0.00114 Pa·s. For a 10mm diameter channel carrying 6 L/min:
- Flow velocity v = Q / A = (6/60,000) / (π × 0.005²) ≈ 1.27 m/s
- Re = (999 × 1.27 × 0.010) / 0.00114 ≈ 11,100 — fully turbulent
Target Reynolds Number Range
| Reynolds Number | Flow Regime | Heat Transfer Consequence |
|---|---|---|
| < 2,300 | Laminar | Nusselt number (Nu) is ~3.7 for uniform heat flux — very low heat transfer. Cooling effectiveness drops 5–10× vs. turbulent. |
| 2,300–4,000 | Transitional | Unstable, unpredictable heat transfer. Avoid this range in design. |
| 4,000–8,000 | Turbulent (target range) | Nu scales as Re^0.8 — good heat transfer. Practical for most mold cooling circuits. |
| > 8,000 | Fully turbulent | Excellent heat transfer. Higher pressure drop. Justified for critical applications. |
Moldflow reports Reynolds number for each channel segment. Check that every segment in the circuit meets the target Re — not just the main trunk. Branch channels that are wider in diameter or carry less flow are most at risk of laminar flow.
Pressure Drop Budget
The total pressure drop across a conformal cooling circuit is the sum of friction losses through each channel segment plus minor losses at bends and diameter changes. Typical values for a well-designed conformal circuit:
- Simple conformal spiral or zigzag, single insert: 1.5–3.5 bar
- Complex multi-pass conformal circuit, full mold half: 3–6 bar
- Chiller/pump capability (typical industrial chiller): 3–8 bar available
If the simulation predicts a pressure drop above 6 bar, you have several options: increase channel diameter (but check that Re remains adequate), split the circuit into parallel branches, or reduce circuit length by adding an additional inlet/outlet. Do not simply increase pump capacity — this increases flow velocity and may cause erosion of the as-printed channel walls.
7. Warpage Prediction: Reading the Deflection Plots
Warpage simulation output is a vector plot showing the predicted deflection of the ejected part at every mesh node. The plot has both a magnitude (mm of displacement from the nominal geometry) and a direction (which way the part distorts). Both are needed to assess whether the warpage is acceptable.
How to Read a Deflection Plot
- Maximum deflection value — the single number most engineers look for. Compare against your part's critical tolerance requirement. A part with a ±0.3mm flatness tolerance can tolerate 0.15–0.2mm warpage; a part with ±0.05mm cannot tolerate more than 0.02–0.03mm.
- Deflection direction — the plot shows which surfaces bow inward or outward. This tells you which dimensions are most affected. A thin-wall box that cups inward at the base has a very different rejection consequence than one that twists along its diagonal.
- Deflection pattern — uniform deflection (whole part moves same direction) is easier to compensate by adjusting ejection or fixture; differential deflection (opposing regions move in opposite directions) indicates residual stress that cannot be corrected by fixturing.
Conventional vs. Conformal Cooling: Expected Warpage Reduction
The primary value of conformal cooling simulation is the before/after comparison. Run the same simulation twice — once with the conventional drilled cooling circuit and once with the conformal design — and compare the warpage output.
| Part Type | Typical Warpage: Conventional | Typical Warpage: Conformal | Reduction |
|---|---|---|---|
| Flat plate (2mm wall, ABS) | 0.8–1.5mm | 0.15–0.35mm | 70–80% |
| Deep core box (PP, 3mm wall) | 1.5–3.0mm | 0.3–0.7mm | 75–85% |
| Thin-wall medical housing (PC, 1mm wall) | 0.4–0.9mm | 0.05–0.15mm | 80–85% |
| Automotive trim panel (PP+GF30, 2.5mm) | 2.0–4.5mm | 0.5–1.2mm | 65–75% |
Critical Dimensions to Monitor
When reviewing warpage output, identify and record the deflection at specific critical dimensions listed in the part drawing — not just the maximum deflection across the whole part. The maximum deflection often occurs at a corner or edge that is not a functional surface. The critical dimensions are the datum surfaces, mating interfaces, and any geometry with a tolerance tighter than ±0.2mm.
8. Five Common Simulation Mistakes (and How to Avoid Them)
These errors appear repeatedly in projects we review. For a broader list of production-side issues, see our conformal cooling troubleshooting guide.
Mistake 1: Using Generic Resin Data Instead of Supplier Grade Data
Every resin database entry in Moldflow or Moldex3D is tied to a specific supplier grade measured at a specific time. Using a generic "PP Homopolymer" entry instead of the actual grade (e.g., SABIC PP 579S) can introduce ±15% error in Cp and k. For a 20-second cooling phase, that is a ±3-second error in predicted cycle time — meaningful when you are trying to justify conformal cooling ROI over a 500,000-part production run.
Fix: Contact your resin supplier's technical team and request the Moldflow/Moldex3D material data card for your specific grade. Most major suppliers provide this free on request.
Mistake 2: Setting Coolant Temperature to Ambient Instead of Chiller Setpoint
The default coolant inlet temperature in many simulation setups is 20–25°C — close to ambient room temperature. If your actual chiller runs at 12°C, this error means the simulation underestimates the temperature driving force for heat removal by 8–13°C, predicting longer cooling times than you will achieve in production, and underestimating how uniform the cooling will be.
Fix: Use the actual chiller setpoint from your facility's chiller specification. If the mold will be used in multiple plants, simulate at the worst-case (warmest) coolant temperature.
Mistake 3: Ignoring Conduction Through the Parent Mold Steel
The conformal cooling insert does not exist in isolation — it sits inside a parent mold plate made of P20, H13, or 1.2343 steel. Heat flows not only from the plastic through the insert into the channels, but also laterally through the insert walls into the surrounding mold plate, and from there into adjacent cooling circuits. If you simulate the insert in isolation with adiabatic boundary conditions on its outer surfaces, you overestimate the temperature rise in the insert and underestimate the cooling capability of the circuit.
Fix: Include the parent mold plate geometry in the simulation with appropriate thermal boundary conditions. If the parent plate has conventional drilled cooling, include those circuits too — even approximately.
Mistake 4: Running a Full Cycle Analysis Without Running Cooling-Only First
A full cycle simulation (fill + pack + cool + warp) in Moldflow takes 2–8 hours. If there is a fundamental problem in the cooling channel design — wrong Re, poor temperature uniformity — you will not know until the simulation finishes. Running a cooling-only analysis first (30–60 minutes) checks the thermal performance of the circuit in isolation. If the cooling-only result is good, proceed to full cycle. If it fails, fix the channel design and iterate — at 30-minute turnaround instead of 8 hours per iteration.
Fix: Always run cooling analysis as a standalone first check before triggering the full molding cycle simulation.
Mistake 5: Ignoring Channel Surface Roughness Effects
LPBF-printed conformal channels have an as-built internal surface roughness of Ra 8–20 µm (depending on build orientation and material). The simulation's default heat transfer coefficient assumes a smooth channel (Ra < 1 µm, typical of machined/reamed steel). The Moody friction chart shows that Ra 15 µm in a 10mm channel at Re 6,000 increases the friction factor by approximately 20–35% compared to smooth pipe — which means higher pressure drop than simulated, and slightly higher actual heat transfer coefficient (surface roughness enhances convective mixing).
The net effect is usually conservative (simulation underpredicts pressure drop), but the discrepancy should be understood. If your circuit is already at the limit of available pump pressure drop in simulation, the actual printed circuit may exceed it.
Fix: After getting a good simulation result, add a 15–20% safety margin to the predicted pressure drop when sizing the coolant pump and specifying the chiller. For detailed hydraulic analysis, use ANSYS Fluent or Autodesk Fusion CFD with an explicit roughness model.
9. When to Trust Simulation vs. When to Test
Simulation is a model — it is as accurate as its inputs and assumptions. The three scenarios below describe how much confidence to place in the results before committing to manufacture:
Scenario A: Simple Geometry, Known Resin — Trust the Simulation
Characteristics: Uniform wall thickness (<±30% variation), well-established commodity resin (PP, ABS, PA66) with grade-specific material data, flat or gently curved cavity, conventional process conditions.
Recommendation: Simulation results are reliable to ±10–15% on cooling time and ±2–3°C on temperature uniformity. Proceed to manufacture based on simulation output alone. Verify first shot against simulation predictions as a calibration check.
Scenario B: Complex Multi-Material or Multi-Insert System — Validate on First Shot
Characteristics: Multiple inserts with different materials or different conformal channel designs sharing a common cooling circuit; overmolded parts where two materials with different thermal properties are present; family molds with cavity size variation.
Recommendation: Simulation captures the dominant thermal behavior but multi-insert hydraulic interaction and cross-conduction effects introduce 15–30% uncertainty. Build the mold, run first-shot trials, measure actual part temperature with thermal imaging, and compare against simulation. Adjust flow rates or add circuit balancing valves based on first-shot data before production release.
Scenario C: First-Time Use of a New Resin — Always Test
Characteristics: New high-performance resin (PEEK, PEI, LCP, bioresorbable polymers) where material database entries are limited; experimental blends or internally compounded materials; any resin where the grade-specific PVT and thermal data are not available from the supplier.
Recommendation: Use simulation for directional guidance only — to compare design options relative to each other, not for absolute predictions. Run physical tests with thermocouples embedded in the mold at the predicted hot spots. Use test data to calibrate the material database entry before relying on simulation for subsequent projects with the same resin.
10. MouldNova Free Simulation Offer
When you request a conformal cooling insert quote from MouldNova, a Moldflow cooling analysis is included — at no additional cost — for qualifying projects. This is not a simplified parametric estimate; it is a full 3D cooling simulation run by our engineering team on your actual insert geometry.
What the Free Simulation Report Includes
- Temperature map — color contour of cavity surface temperature at end of cooling phase, with ΔT clearly labeled
- ΔT table — maximum, minimum, and average surface temperature at end of cooling, with ΔT assessment against the design criteria table (Section 5 above)
- Pressure drop calculation — total circuit pressure drop (bar) and required flow rate (L/min) at the simulated process conditions
- Cycle time prediction — estimated cooling time and total cycle time vs. conventional cooling baseline for your insert geometry
- Design observations — written notes from our engineering team identifying any hot spots or hydraulic concerns, with recommended modifications if needed
How to Request the Free Simulation
- Send your mold insert STEP file and a brief process specification (resin type and grade, target mold temperature, estimated cycle time, annual production volume)
- Our engineering team reviews geometry and assigns a simulation engineer
- Simulation report delivered within 48 hours (standard); 24 hours for urgent requests via WhatsApp
- You review the report and either approve the channel design or request modifications — at no additional charge
- Once you approve the design, we issue a firm manufacturing quote and lead time
Get Your Free Conformal Cooling Simulation
Send your insert STEP file and process requirements. We'll return a full Moldflow cooling analysis — temperature map, ΔT table, pressure drop, cycle time prediction — within 48 hours. No software required on your end.
Send STEP File for Free Analysis WhatsApp — Fast Quote11. Frequently Asked Questions
What does a conformal cooling simulation actually calculate?
A conformal cooling simulation in Moldflow or Moldex3D calculates four primary outputs: (1) cooling time map — the time required for each region of the cavity surface to reach ejection temperature; (2) temperature distribution — the ΔT between the hottest and coolest points on the cavity at the end of the cooling phase; (3) coolant pressure drop and required flow rate across the channel circuit; and (4) warpage prediction — the deflection magnitude and direction caused by differential shrinkage from non-uniform cooling.
What is an acceptable temperature difference (ΔT) in conformal cooling simulation results?
ΔT below 5°C across the cavity surface is considered excellent and indicates very uniform cooling. A ΔT of 5–10°C is acceptable for most commercial parts. A ΔT of 10–20°C indicates warpage risk and should prompt design review. A ΔT above 20°C indicates the cooling design needs to be redesigned before manufacturing — at this level, differential shrinkage will almost certainly cause part warpage beyond acceptable tolerances.
What Reynolds number should conformal cooling channels target?
Conformal cooling channels should target a Reynolds number (Re) of 4,000–8,000, which places flow firmly in the turbulent regime. Turbulent flow is critical because the Nusselt number (which governs heat transfer) drops 5–10× in laminar flow. A channel that looks correctly sized in a drawing but carries laminar flow (Re < 2,300) will perform dramatically worse than expected. Target flow rates should be verified in simulation to confirm turbulent flow through every branch of the circuit.
What are the most common mistakes in conformal cooling simulation setup?
The five most common mistakes are: (1) using generic resin data instead of the actual supplier grade datasheet — thermal conductivity and specific heat can vary ±15% between grades; (2) setting coolant inlet temperature to ambient (20°C) instead of the actual chiller setpoint (often 10–15°C or lower); (3) ignoring heat conduction through the parent mold steel surrounding the insert; (4) skipping a cooling-only analysis and running a full cycle simulation immediately, making it harder to isolate cooling problems; and (5) not accounting for channel surface roughness — as-printed LPBF channels have Ra 8–20 µm, which increases friction factor and pressure drop compared to smooth-channel assumptions in default simulation settings.
Can I get a free conformal cooling simulation report?
Yes. MouldNova (operated by Saiguang 3D Technology) provides a free Moldflow cooling analysis as part of the quotation process for conformal cooling inserts. The report includes a temperature map, ΔT table, pressure drop calculation, and cycle time prediction. Turnaround is typically 48 hours. Send your mold insert STEP file and resin/process requirements via WhatsApp (+86 182 6866 1068) or the contact page.