3D printing and metal casting are not competing processes — they are increasingly complementary ones. Engineers who understand how to combine them unlock a route to metal parts that is faster than traditional casting, cheaper than direct metal 3D printing at volume, and capable of producing alloys that no metal powder bed system can match.
This guide covers the three principal ways 3D printing is used to improve metal casting: (1) 3D-printed wax or resin patterns for investment casting, which eliminate expensive pattern tooling; (2) 3D-printed sand molds and cores for sand casting, produced by binder jetting without any pattern tooling at all; and (3) 3D-printed conformal cooling inserts for die casting dies, which improve heat extraction, reduce cycle time, and extend die life. Each section explains the technology, the business case, and the practical constraints you need to know before committing to a path.
1. How 3D Printing Enables Better Metal Casting
Traditional metal casting — whether investment, sand, or die — relies on patterns, molds, and tooling that must be machined from metal or wood. These tools are expensive (investment casting wax tooling: $3,000–$20,000 per pattern; sand casting match plates: $5,000–$30,000; die casting dies: $30,000–$200,000) and slow to produce (4–12 weeks lead time is normal). For small batches, prototypes, or geometrically complex parts, these costs and lead times are prohibitive.
3D printing disrupts all three phases of the traditional tooling chain:
- Pattern phase: SLA, DLP, and FDM printers can produce wax-like burnout patterns directly from CAD data in 12–48 hours for a fraction of injected-wax tooling cost. No pattern tooling is needed.
- Mold phase: Binder jetting can print sand molds and cores directly from CAD data, eliminating match plates and core boxes entirely. Complex internal geometries — oil galleries, water jackets, undercuts — that would require multiple piece cores can be printed as single integrated units.
- Die tooling phase: Metal 3D printing (SLM/DMLS) produces die inserts with internal conformal cooling channels that cannot be machined by any conventional method, enabling heat extraction performance impossible with drilled tooling.
The traditional casting workflow requires a pattern tool before a single cast part can be produced. 3D printing eliminates this gating step, compressing the path from CAD to first metal part from 6–14 weeks to 5–10 days. This makes casting economically viable at quantities of 1–50 units where it was previously impractical.
2. Investment Casting with 3D Printed Patterns (SLA/DLP)
Investment casting — also called lost-wax casting — is the highest-precision casting process available for complex metal parts. It achieves tolerances of ±0.1–0.3 mm and surface finishes of Ra 3–6 µm as-cast, approaching the quality of machined surfaces. Traditional investment casting uses injected-wax patterns, which require precision steel tooling. 3D-printed resin patterns eliminate this requirement entirely.
How the Process Works
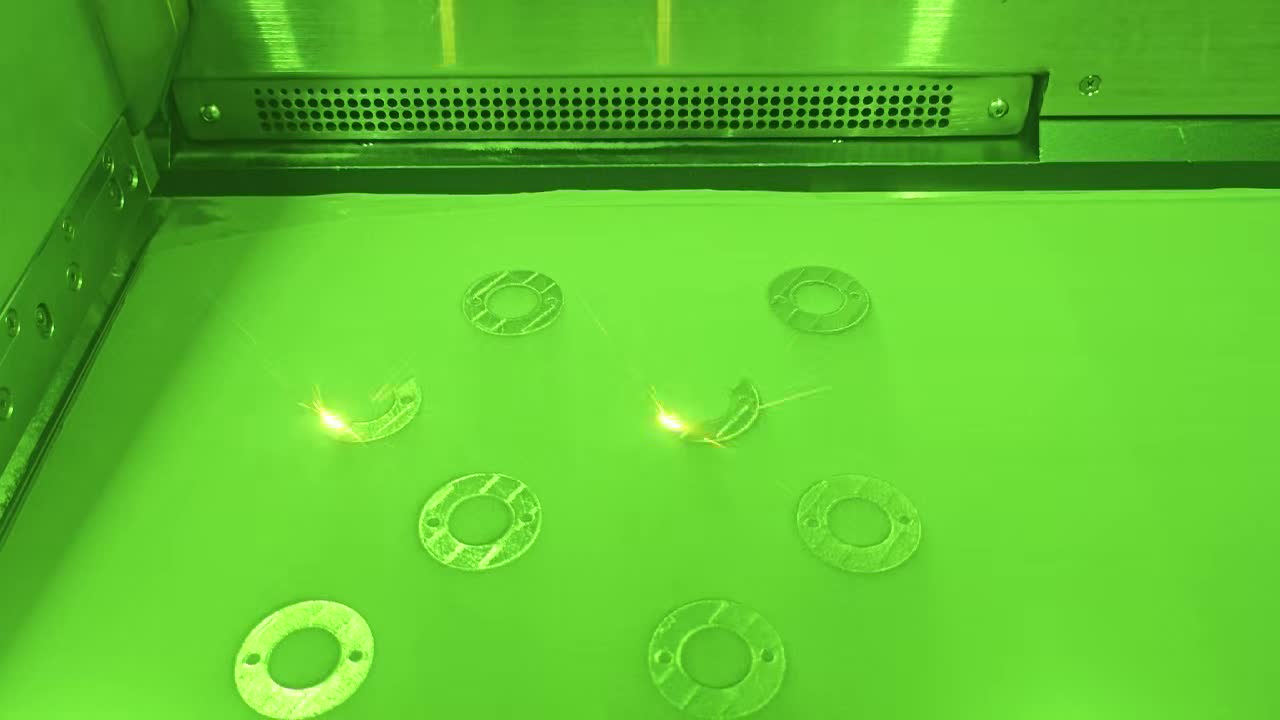
An SLA, DLP, or MJF printer produces a pattern in castable resin. Hollow or lattice-filled "Quickcast" structures reduce resin volume by 60–80%, minimizing thermal expansion stress during burnout. Common resins: 3D Systems Accura Castable, Somos EvoLVe 128, Formlabs Castable Wax, Asiga PlasCast.
The pattern is dipped repeatedly in ceramic slurry (typically alumino-silicate) and coated with stucco sand. After 8–12 dip cycles over 2–3 days, a ceramic shell 6–10 mm thick surrounds the pattern. The shell is dried thoroughly before burnout.
The shelled assembly is loaded into an autoclave or flash-fire oven at 850–1050°C. The resin pattern burns out completely, leaving a cavity in the exact geometry of the original CAD model. A final high-temperature firing strengthens the shell. This step requires resin with <0.1% ash content to avoid inclusions in the casting.
Molten metal is poured into the pre-heated ceramic shell under gravity or vacuum assist. After solidification, the ceramic shell is broken away and the casting is cut from the gating system, heat-treated if required, and finish-machined on critical surfaces only.
When 3D-Printed Investment Casting Patterns Make Sense
The investment casting + 3D-printed pattern route is the right choice when:
- Part quantity is 1–200 units (above ~500 units, injected wax tooling amortizes favorably)
- Geometry is too complex for direct metal 3D printing (thin walls below 0.8 mm, internal channels, undercuts)
- Target alloy is not available in direct-print powder form (brass, bronze, gray iron, A380 aluminum)
- Surface finish requirements are Ra 3–10 µm — better than FDM but similar to SLM
- Part size exceeds the build volume of available metal printers (most SLM systems max out at 250–400 mm)
A tier-2 aerospace supplier replaced $18,000 in wax injection tooling with $340 in SLA castable resin patterns for a titanium bracket prototype run of 12 units. Total lead time compressed from 11 weeks to 9 days. Surface finish (Ra 4.2 µm as-cast) exceeded specification without secondary polishing.
3. Sand Casting with Binder Jetting (ExOne, Voxeljet)
Sand casting is the world's most widely used casting process by volume, producing everything from engine blocks to pump housings to sculpture. Its traditional weakness is lead time: producing the patterns, match plates, and core boxes needed before the first sand mold can be rammed takes 4–10 weeks. Binder jetting eliminates all of this tooling.
Binder Jetting for Sand Molds and Cores
Binder jetting systems from ExOne (now Desktop Metal), Voxeljet, and Viridis3D print sand molds directly from STL files. The printer deposits a liquid binder into a bed of silica, zircon, or chromite sand, bonding it layer by layer into a rigid mold. No heat is applied during printing. The resulting mold is removed from the powder bed, excess sand is vacuumed away, and the mold is ready for pouring — typically within 6–24 hours of print start.
Key specifications for production binder-jetted sand molds:
- Layer thickness: 200–400 µm (finer than hand-rammed green sand)
- Minimum wall in mold: 3–5 mm (thinner walls are fragile during handling)
- Dimensional accuracy: ±0.3–0.5 mm (comparable to conventional sand casting)
- Maximum build volume: Voxeljet VX4000 reaches 4,000 × 2,000 × 1,000 mm — suitable for large engine castings
- Binder systems: Furan, phenolic, and inorganic binders; inorganic binders produce lower gas porosity and are preferred for aluminum
Advantages Over Conventional Sand Casting Tooling
Binder-jetted sand molds deliver three structural improvements over conventionally tooled sand casting:
- Complex cores without core boxes: Oil passages, water jackets, and internal cavities that previously required multiple separate cores assembled by hand can be printed as single integrated units. This eliminates core assembly error and reduces the number of parting-line flash locations.
- No draft angle requirement: Because the mold is not drawn from a pattern, vertical surfaces and slight undercuts are possible without the 1–3° draft angles that conventional sand casting requires. This often eliminates post-cast machining on functional surfaces.
- Direct iteration from CAD: Design changes cost nothing in tooling terms. A revised STL file produces a revised mold in the next print cycle. This makes binder-jetted sand casting the preferred route for casting development and design validation programs.
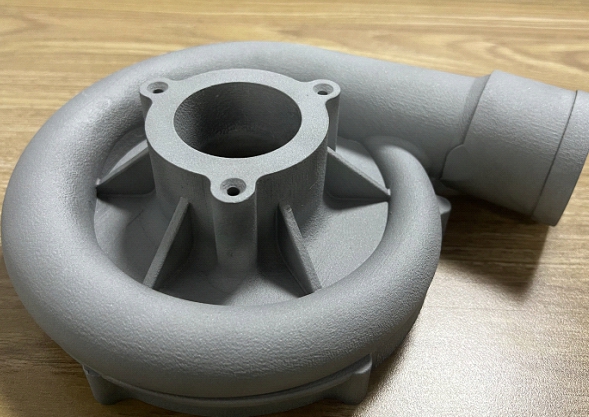
4. Die Casting with 3D Printed Conformal Cooling Inserts
Die casting uses permanent steel tooling (dies) under high pressure to produce aluminum, zinc, and magnesium parts at very high volumes. Unlike investment and sand casting, die casting tooling is not consumed per part — the same die may produce 100,000 to 500,000 shots before refurbishment. The opportunity for 3D printing in die casting is not to replace the die, but to radically improve its thermal performance through conformal cooling.
The Problem with Conventional Die Cooling
Die casting dies are cooled through straight-drilled waterline channels. Conventional drilling can only produce straight passages, which means that curved die cavity surfaces — the norm in virtually every die casting part — are cooled unevenly. The closest a conventional waterline can approach a curved cavity surface is dictated by the drill path, not the cavity shape. The result is a die surface with temperature variations of ±20–40°C during steady-state production.
These temperature non-uniformities have cascading consequences:
- Hot spots cause thermal fatigue cracking (heat checking) that limits die life to 80,000–120,000 shots instead of the 300,000+ shots achievable with well-controlled thermal cycling
- Uneven cooling creates differential solidification that causes porosity — particularly problematic for structural automotive castings requiring pressure-tightness
- Extended cycle time: to avoid cold-shut defects caused by premature solidification in hot-spot areas, operators increase cycle time by 15–30% as a quality buffer
Conformal Cooling Inserts for Die Casting Dies
MouldNova's approach uses SLM-printed H13 hot-work tool steel or maraging steel inserts that contain internal conformal cooling channels printed directly into the insert geometry. These channels follow the die cavity surface at a constant 2–3 mm standoff distance — impossible to achieve with any drill. The thermal performance improvement is substantial:
- Die surface temperature variation reduced from ±30°C to ±4–6°C
- Cycle time reduction: 15–25% on aluminum die casting (A380, ADC12)
- Die life extension: 30–60% more shots before heat-check refurbishment
- Porosity reduction: 40–70% fewer pressure-leak failures on structural parts
For more detail on this application, see our dedicated guide: Conformal Cooling for Die Casting. Our full metal 3D printing capabilities are described at Metal 3D Printing Service.
5. Comparison: Direct Metal 3D Printing vs. 3D Print + Cast
Choosing between printing metal directly and using a 3D-printed pattern or mold for casting depends on quantity, alloy, geometry, and budget. The table below summarizes the key decision criteria across both routes.
| Criterion | Direct Metal 3D Printing (SLM/DMLS) | 3D Print + Investment Cast | 3D Print + Sand Cast |
|---|---|---|---|
| Minimum order quantity | 1 part | 1 part | 1 part |
| Cost at 1–5 parts | $$$ (high machine time) | $$ (pattern + foundry) | $$ (mold print + pour) |
| Cost at 50–500 parts | $$$$ (scales poorly) | $$ (best range) | $$$ (mold per unit) |
| Dimensional tolerance | ±0.05–0.15 mm | ±0.1–0.3 mm | ±0.3–0.8 mm |
| Surface finish (as-built/as-cast) | Ra 6–15 µm | Ra 3–6 µm | Ra 6–25 µm |
| Alloy range | ~25 commercial powder alloys | Any castable alloy (100+) | Any castable alloy (100+) |
| Maximum part size | ~400 mm (build volume limit) | Up to ~600 mm practical | Meters (no size limit) |
| Internal features / channels | Excellent (conformal channels) | Good (investment cast) | Good (printed cores) |
| Density / porosity | >99.5% density | 98–99.5% (vacuum assist) | 96–99% typical |
| Lead time (first part) | 3–7 days | 5–10 days | 3–7 days |
| Lead time (vs. traditional) | Same — no tooling needed | 6–11 weeks faster | 4–10 weeks faster |
6. When to Cast vs. When to Directly 3D Print Metal
The right process is determined by five factors working in combination. No single factor is decisive on its own.
Choose Direct Metal 3D Printing (SLM/DMLS) When:
- Quantity is fewer than 20 units and the part fits the build volume — at very low quantities, the absence of any tooling amortization makes direct printing the cheapest route even though per-part machine time is high
- Tolerance requirements are below ±0.2 mm — direct printing is the only route to ±0.05–0.15 mm without post-machining
- Internal conformal features are required — cooling channels, lattice structures, and topology-optimized internal geometries print more cleanly in direct metal printing than in cast parts
- The required alloy is available as powder — if the part must be 316L stainless, 17-4 PH, Ti-6Al-4V, or maraging steel, direct printing is the appropriate route
- Post-processing must be minimal — direct-printed parts require less ceramic shell removal and cleanup than cast parts
Choose 3D Print + Casting When:
- Quantity is 20–500 units — in this range, investment casting with 3D-printed patterns consistently delivers lower cost per part than direct SLM printing
- The target alloy is not available in SLM powder — gray iron, ductile iron, yellow brass, silicon bronze, A380 aluminum, and dozens of other commercial alloys require casting
- Part size exceeds 400 mm — large structural components (pump housings, gearbox cases, impellers) exceed the build volume of available metal printers and must be cast
- Surface finish requirements are Ra 3–6 µm as-produced — investment casting delivers better surface finish than SLM without post-polishing
- Tooling lead time is the bottleneck — replacing 8-week pattern tooling with 2-day 3D-printed patterns while retaining casting as the production process is often the fastest path
7. Materials Achievable Through Casting vs. Direct Printing
The alloy range is one of the most decisive advantages of casting over direct metal 3D printing. Direct metal printing is limited to alloys that can be atomized into spherical powder with consistent chemistry, narrow particle size distribution, and flowability suitable for powder bed processes. Casting has no such constraint — any metal that can be melted can be cast.
Alloys Achievable Through Casting That Cannot Be Directly 3D Printed
| Alloy Family | Common Grades | Key Properties | Typical Casting Process |
|---|---|---|---|
| Gray Iron | GG25, GG30, FC250 | Excellent vibration damping, low cost, good machinability | Sand casting |
| Ductile Iron | GGG40, GGG70, EN-GJS | Higher strength than gray iron, impact resistance | Sand casting |
| Yellow Brass | CuZn37, C28000 | Corrosion resistance, machinability, decorative | Investment or sand casting |
| Silicon Bronze | C87500, CuSi3Mn1 | Marine corrosion resistance, weldability | Investment or sand casting |
| Tin Bronze | C90300, PB1, CuSn10 | Bearing applications, low friction, wear resistance | Sand or centrifugal casting |
| Al Casting Alloys | A380, A356, LM25, ADC12 | High fluidity for thin walls, pressure die casting grades | Die casting, investment casting |
| Nickel-Al Bronze | C95400, CuAl10Ni5Fe4 | Marine, pump impellers, high-load bearings | Sand or investment casting |
| White Metal / Babbitt | SnSb11Cu6, ASTM B23 | Plain bearing overlay, low friction | Centrifugal or static casting |
In contrast, commercially available direct-print metal alloys number fewer than 30 and are concentrated in four families: stainless steels (316L, 17-4 PH, 15-5 PH), tool steels (H13, M2, maraging 300/350), titanium alloys (Ti-6Al-4V, Ti-6Al-4V ELI), and nickel superalloys (IN625, IN718, Hastelloy X). Copper and aluminum alloys are available but limited in grade selection.
8. Cost Comparison and Volume Thresholds
The crossover point where casting becomes cheaper than direct metal 3D printing depends on part complexity, weight, and the specific casting process. The following worked examples use realistic 2026 pricing for a mid-complexity aluminum component weighing approximately 800 g.
Direct SLM printing (AlSi10Mg): Machine time at $3.50/cm³ deposited × 320 cm³ = $1,120 per part. Total 5 units: $5,600. Lead time: 5 days.
Investment cast with SLA pattern (A356): SLA pattern $180, ceramic shell and pour $280, finishing $80. Total per unit: $540. Total 5 units: $2,700. Lead time: 8 days.
Casting saves $2,900 (52%) at 5 units — already significantly cheaper despite longer lead time.
Direct SLM printing: $1,120/unit × 50 = $56,000. Lead time: 25 days (5 build cycles).
Investment cast with SLA patterns: Pattern $180 × 50 = $9,000; casting $220/unit × 50 = $11,000; finishing $60/unit × 50 = $3,000. Total: $23,000. Lead time: 14 days.
Investment cast with wax injection tooling (amortized): Tooling $8,000 ÷ 50 = $160; wax + cast $180/unit × 50 = $9,000. Total: $17,000. Lead time: 10 weeks for first parts.
At 50 units: SLA-pattern casting ($23,000) beats direct printing ($56,000) by 59%. Traditional wax tooling beats both on unit cost but requires 10-week tooling lead time.
1–10 units: Direct metal printing often competitive due to zero tooling overhead, especially for small, complex parts. 3D-print + investment cast competitive for larger or iron/bronze alloy parts.
10–200 units: 3D-print + investment casting with printed patterns is almost always the lowest total cost route for non-ferrous alloys.
200–1,000 units: Conventional investment casting with injected-wax tooling becomes competitive. Binder-jetted sand casting competitive for larger, simpler parts.
1,000+ units: Conventional casting dominates. 3D printing re-enters the equation only for die casting conformal cooling inserts that improve production efficiency.
9. Case Examples
Challenge: A defense contractor needed 12 units of a titanium structural bracket for flight test. Traditional wax injection tooling would cost $22,000 and take 9 weeks. Direct SLM printing quotes came in at $2,800/unit — $33,600 total — with Ra 12 µm surface finish that required extensive post-polishing on aerodynamic surfaces.
Solution: SLA Quickcast patterns (3D Systems Accura Castable) printed in 18 hours at $290/pattern. Ceramic shell built and poured by a specialist titanium investment foundry under vacuum. Total pattern + casting cost: $1,650/unit × 12 = $19,800.
Result: $13,800 saved vs. direct SLM printing. Surface finish Ra 4.8 µm as-cast, within specification without polishing. Lead time: 9 days from CAD to first part.
Challenge: A powertrain engineering team needed 3 prototype engine blocks in gray iron GG25 for dynamometer testing. The blocks contain complex water jacket cores and oil passages that would require 6 separate conventionally rammed cores. Pattern tooling estimate: $45,000, 12-week lead time. No conventional foundry would quote fewer than 50 units.
Solution: Voxeljet VX1000 binder jetting produced complete mold assemblies — cope, drag, and all internal cores as a single integrated unit — from CAD in 22 hours. Poured at a local iron foundry with no tooling required.
Result: 3 prototype blocks delivered in 11 days at $8,400 total vs. $45,000+ tooling plus castings. Core assembly eliminated entirely; no flash at internal core joints. Dimensional accuracy ±0.5 mm met engineering requirements.
Challenge: A Tier-1 automotive supplier was experiencing heat-check cracking on a structural bracket die after 95,000 shots, requiring expensive refurbishment. Cycle time of 52 seconds was limiting capacity. Wall thickness variation ±0.4 mm exceeded drawing tolerance of ±0.25 mm at high-volume production rates.
Solution: MouldNova designed and SLM-printed H13 conformal cooling inserts to replace four conventional waterline-cooled inserts. Conformal channels followed the cavity surface at 2.5 mm standoff. See conformal cooling die casting and making molds with 3D printing for methodology detail.
Result: Die surface temperature variation reduced from ±28°C to ±5°C. Cycle time reduced to 41 seconds (21% improvement). Die life extended to 160,000+ shots before refurbishment. Wall thickness variation ±0.18 mm — within tolerance. Annual saving: $186,000 in cycle time plus $42,000 in die maintenance avoidance.
10. FAQ — 3D Print Metal Casting
Yes. SLA and DLP resin patterns are the most widely used 3D-printed investment casting patterns, replacing traditional injected-wax tooling that can cost $2,000–$20,000 per pattern. The resin pattern is coated in ceramic slurry, burned out in an autoclave or flash-fire oven, and replaced with molten metal exactly as a wax pattern would be. Quickcast-style hollow SLA patterns minimize thermal expansion stress during burnout and are the industry standard for aerospace and industrial investment casting prototyping.
Direct metal 3D printing (SLM, DMLS, EBM) builds metal parts layer by layer from metal powder. 3D print + casting uses a 3D-printed pattern or mold to produce parts by traditional casting. Direct printing offers tighter tolerances (±0.05–0.15 mm), higher density (>99.5%), and access to specialist alloys in powder form. Casting achieves much lower cost per part at volume above 20–50 units, access to a far wider range of alloys (gray iron, bronze, brass, and aluminum casting grades unavailable in powder form), and near-net-shape geometry for large parts that exceed direct-print build volumes.
Binder jetting is the dominant technology for 3D printing sand casting molds and cores. Systems from ExOne (now Desktop Metal) and Voxeljet print silica or ceramic sand bound with furan or inorganic binder. The resulting molds match the dimensional accuracy and permeability of hand-rammed sand molds but can be produced from CAD data in 6–24 hours without any pattern tooling. Binder-jetted sand molds are ideal for prototype castings, short runs of 1–50 units, and complex cores (oil passages, water jackets) that cannot be produced with conventional core boxes.
Casting opens access to a far wider alloy range than direct metal 3D printing. Gray iron (GG25, GG30) and ductile iron are routinely cast but unavailable as SLM powder. Yellow brass, silicon bronze, and tin bronze are widely investment cast for corrosion-resistant and marine applications. Aluminum casting alloys A380 and ADC12 are the primary alloys for pressure die casting but are distinct from the Al-Si-Mg alloys used in direct printing. Nickel-aluminum bronze for pumps and valves, and various white metal / Babbitt bearing alloys, are also exclusively cast. In general, any metal that can be melted can be cast, while direct printing is limited to fewer than 30 commercially available powder alloys.
Metal 3D printing (SLM) enables conformal cooling channels inside die casting inserts — channels that follow the cavity surface at a constant 2–3 mm standoff, impossible to achieve with conventional drilling. MouldNova's conformal cooling inserts reduce die surface temperature variation from ±30°C to ±5°C, cut cycle time by 15–25%, extend die life by 30–60% by reducing thermal fatigue, and reduce porosity in structural castings by 40–70%. For a 200,000-shot/year program, these improvements typically save $150,000–$250,000 annually per die.
Related Pages
- Metal 3D Printing Service — SLM Capabilities, Materials & Lead Times
- Conformal Cooling for Die Casting — Full Technical Guide
- Making Molds with 3D Printing — From Concept to Production
- Conformal Cooling Inserts — Service Details & Specifications
- Case Studies — Full Production Data from Real Programs